
Yes, you can build a highly effective DIY solar pool heater for under $500 using common materials from your local hardware store. This guide will walk you through the entire process, from choosing the right design to assembling the collector and connecting it to your pool.
As a pool heating professional who has seen countless DIY projects, I can tell you that building your own solar heater is one of the most rewarding and cost-effective upgrades you can make to your pool. Forget spending thousands on a commercial system; with a little bit of time and effort, you can extend your swimming season and enjoy a warm pool for a fraction of the cost. This article will provide a step-by-step guide to building a proven, high-performance DIY solar pool heater, complete with a materials list, cost breakdown, and real-world performance data.
What Are the Different DIY Designs?
There are several popular designs for DIY solar pool heaters, ranging from simple and inexpensive to more complex and efficient. The best design for you will depend on your budget, your DIY skills, and your performance goals. Let’s take a look at the three most common approaches.
The simplest and cheapest design is the “coil” or “spiral” heater, which consists of a long length of black irrigation tubing coiled on a piece of plywood. This design is incredibly easy to build and can be done for under $100. However, it is also the least efficient, as it has a small surface area and is not insulated.
A more advanced design is the “panel” or “grid” heater, which uses a series of parallel pipes connected to a manifold. This design has a much larger surface area and is more efficient than the coil design. It can be built with either PVC or copper pipes, and it typically costs between $200 and $400 to build.
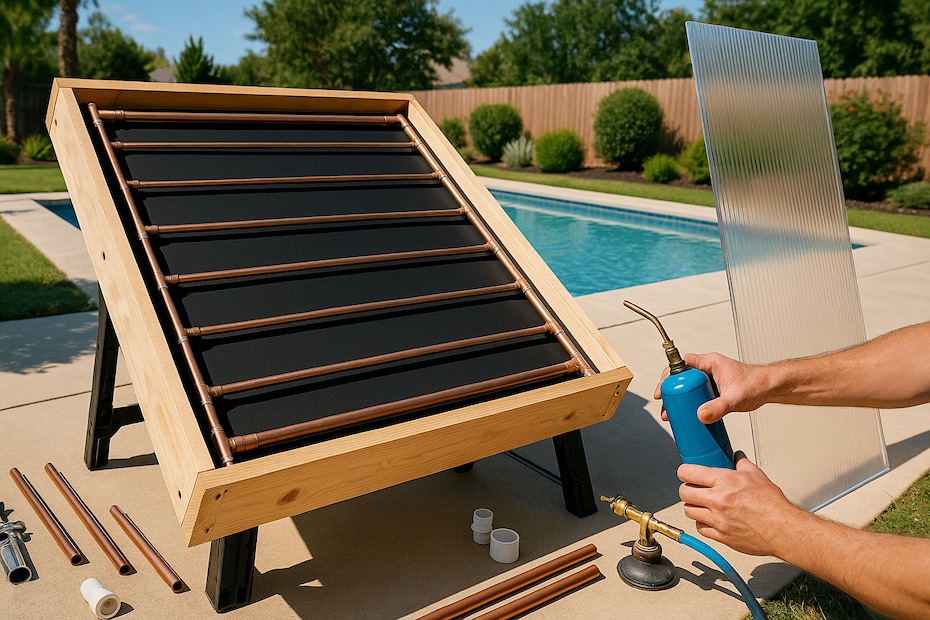
The most efficient and professional-looking design is the “glazed collector” heater, which is essentially a homemade version of a commercial solar panel. This design uses a copper pipe grid in an insulated box with a glass or plastic cover. It is the most expensive and complex design to build, but it also provides the best performance, especially in cooler climates. This is the design we will be focusing on in this guide, as it offers the best balance of cost, performance, and durability.
What Materials Will You Need?
This project uses common materials that you can find at any major hardware store. The total cost will be between $400 and $500, depending on the price of copper and whether you can salvage any materials. Here is a complete list of what you will need to build a 4’x8’ glazed solar collector.
| Category | Item | Quantity | Estimated Cost |
|---|---|---|---|
| Collector Box | 4’x8’ sheet of 3/4” pressure-treated plywood | 1 | $50 |
| 8’ pressure-treated 2x4s | 2 | $15 | |
| 4’ pressure-treated 2x4s | 2 | $10 | |
| 4’x8’ sheet of rigid foam insulation | 1 | $20 | |
| Construction adhesive | 1 tube | $5 | |
| Flat black high-heat spray paint | 1 can | $10 | |
| Collector Grid | 100’ of 1/2” Type M copper pipe | 1 | $150 |
| 8’ lengths of 1” Type M copper pipe | 2 | $40 | |
| 1/2” copper tees | 18 | $30 | |
| 1” to 1/2” copper reducing tees | 2 | $10 | |
| Lead-free solder | 1 roll | $15 | |
| Flux | 1 can | $10 | |
| Glazing & Plumbing | 4’x8’ sheet of clear polycarbonate or acrylic | 1 | $80 |
| Silicone sealant | 1 tube | $10 | |
| PVC pipe and fittings | As needed | $30 | |
| 3-way diverter valve | 1 | $25 | |
| Total | ~$500 |
Step-by-Step Build Guide
Now that you have all your materials, it is time to start building. This project can be completed in a weekend, but be sure to take your time and to follow all safety precautions, especially when working with power tools and a soldering torch.
Step 1: Build the Collector Box. Cut the 2x4s to create a 4’x8’ frame. Attach the plywood to the frame with screws. Cut the rigid foam insulation to fit inside the box and secure it with construction adhesive. Paint the entire interior of the box with flat black high-heat spray paint.
Step 2: Assemble the Collector Grid. Cut the 1/2” copper pipe into 18” lengths. Solder the pipes to the tees to create a grid pattern. Solder the 1” to 1/2” reducing tees to the ends of the 1” manifold pipes. Solder the entire grid together, ensuring that all joints are watertight.
Step 3: Install the Collector Grid. Place the copper grid inside the collector box. Secure it with copper pipe straps. Drill holes in the side of the box for the manifold pipes to exit.
Step 4: Install the Glazing. Apply a bead of silicone sealant around the top edge of the box. Carefully place the polycarbonate or acrylic sheet on top of the sealant. Secure it with screws and washers.
Step 5: Plumb the Collector. Connect the collector to your pool pump using PVC pipe and fittings. Install the 3-way diverter valve to allow you to bypass the collector when not in use. Be sure to install a drain valve at the lowest point in the system to allow for winterizing.
What Performance Can You Expect?
With this 4’x8’ glazed solar collector, you can expect to raise the temperature of a 10,000-gallon pool by 5-10°F on a sunny day. This is a significant temperature increase that will make your pool much more comfortable for swimming. For larger pools, you can build multiple collectors and connect them in series to achieve a similar temperature rise.
The key to getting the best performance from your DIY solar heater is to have a slow flow rate. A flow rate of 3-5 gallons per minute is ideal, as it allows the water to spend more time in the collector and to absorb more heat. You can adjust the flow rate by using the 3-way diverter valve to send a portion of the water to the collector and the rest directly back to the pool.
It is also important to use a pool cover in conjunction with your solar heater. A pool cover will reduce heat loss by up to 70%, which will make your solar heater much more effective. Without a cover, you will lose a significant amount of the heat your system generates overnight.
How to Choose the Right Location
The location of your solar collector is critical to its performance. You need to find a spot that gets at least 6 hours of direct sunlight per day, and that is relatively close to your pool equipment. The roof of your house is often the best location, but a ground-mounted rack can also be effective.
A south-facing orientation is ideal in the Northern Hemisphere, as it will provide the most direct sun exposure throughout the day. However, east- and west-facing orientations can also work, especially if you oversize your collector slightly. The ideal tilt for the collector is equal to your latitude, but most systems can perform well on a wide range of roof pitches.
Before you decide on a location, be sure to check for any potential shading from trees, buildings, or other obstructions. Even a small amount of shading can have a significant impact on the performance of your system. It is also a good idea to check with your local building department to see if there are any restrictions on the placement of solar collectors in your area.
How to Automate Your System
While you can manually control your DIY solar heater with a simple diverter valve, an automated system will be much more convenient and efficient. A solar controller is a device that will automatically turn your system on and off based on the temperature of the collectors and the pool. This ensures that your system is only running when it can provide heat, which maximizes its efficiency.
A typical solar controller has two sensors: one that measures the temperature of the collectors, and one that measures the temperature of the pool water. When the collectors are a few degrees warmer than the pool, the controller activates the diverter valve and sends water to the collectors. When the collectors are not warm enough to provide heat, the controller bypasses the collectors and sends the water directly back to the pool.
Solar controllers are relatively inexpensive, and they are a worthwhile investment that will make your DIY solar heater much more effective and user-friendly. They are available from a variety of online retailers, and they are easy to install.
What About Winterizing?
If you live in a climate with freezing temperatures, you will need to winterize your DIY solar heater to prevent it from being damaged by ice. The best way to do this is to install a drain-down system that will automatically drain the collectors when the temperature drops below freezing. This is the most reliable method of freeze protection, and it is essential for ensuring the long-term reliability of your system.
A drain-down system consists of a drain valve that is installed at the lowest point in the system, and a vacuum breaker that is installed at the highest point. When the pump turns off, the drain valve opens and the vacuum breaker allows air to enter the system, which allows the water to drain out of the collectors. This is a simple but effective system that will protect your investment for years to come.
If you do not want to install a drain-down system, you can also manually drain the collectors each fall before the first freeze. This is a more labor-intensive process, but it is just as effective. Be sure to blow out the lines with a compressor to ensure that all the water is removed.
Common Mistakes to Avoid
Building a DIY solar pool heater is a relatively straightforward project, but there are a few common mistakes that can trip up even the most experienced DIYer. By being aware of these potential pitfalls, you can ensure that your project goes smoothly and that you end up with a high-performing system.
One of the most common mistakes is using the wrong materials. It is important to use materials that are designed to withstand the harsh conditions of a rooftop environment, including high temperatures, UV radiation, and extreme weather. Using cheap, low-quality materials will only lead to problems down the road, so it is worth investing in the right materials from the start.
Another common mistake is improper sizing. It is important to size your collector to match the size of your pool and your climate. An undersized collector will not provide enough heat, and an oversized collector will be a waste of money. Be sure to do your research and to use a sizing calculator to determine the right size for your specific needs.
Finally, be sure to pay close attention to the plumbing. A small leak can lead to big problems, so it is important to ensure that all your joints are watertight. It is also important to have a proper drain-down system to protect your system from freezing. Taking the time to do the plumbing right will save you a lot of headaches in the long run.
Alternative Designs and Materials
While the glazed copper collector is the most efficient design, there are other options that may be a better fit for your budget and your DIY skills. Let’s take a look at a few of the most popular alternatives.
If you are on a tight budget, a simple coil heater made from black irrigation tubing is a great option. This design can be built for under $100, and it is incredibly easy to assemble. While it is not as efficient as a glazed collector, it can still provide a significant amount of heat, especially in a sunny climate.
Another popular option is a panel heater made from PVC pipes. This design is more efficient than a coil heater, and it is still relatively inexpensive to build. It is a good choice for those who want a more professional-looking system without the high cost of a copper collector.
Finally, you can also find a variety of DIY solar pool heater kits online. These kits come with all the materials you need to build a complete system, and they are a good option for those who want a proven design without the hassle of sourcing all the materials themselves. They are more expensive than a true DIY build, but they are still much cheaper than a commercial system.
Safety Considerations
Building a DIY solar pool heater is a safe and rewarding project, but it is important to take a few basic safety precautions. By following these simple guidelines, you can ensure that your project is a success and that you and your family can enjoy your warm, solar-heated pool for years to come.
First and foremost, be sure to follow all the manufacturer’s instructions for the tools and materials you are using. This is especially important when working with power tools and a soldering torch. Be sure to wear proper safety gear, including gloves, goggles, and a respirator, and to work in a well-ventilated area.
Second, be careful when working on your roof. A fall from a roof can be a life-threatening injury, so it is important to take all necessary precautions. Be sure to use a sturdy ladder, and to have a spotter on the ground to help you. It is also a good idea to use a safety harness, especially if you are working on a steep roof.
Finally, be sure to have your work inspected by a qualified professional before you turn on your system. A professional will be able to check for any potential problems and to ensure that your system is safe and up to code. This is an important final step that will give you peace of mind and that will ensure the long-term reliability of your system.
The Long-Term Value of a DIY Solar Heater
Beyond the immediate satisfaction of a warmer pool and lower energy bills, a DIY solar pool heater offers significant long-term value. This project is not just about saving money in the short term; it is an investment in your home, your lifestyle, and your energy independence. Let’s explore some of the lasting benefits of this rewarding project.
First, a DIY solar heater can significantly increase the value of your home. A heated pool is a desirable feature for many homebuyers, but the high cost of traditional heating methods can be a major deterrent. A solar-heated pool, on the other hand, is a much more attractive proposition, as it offers all the benefits of a heated pool without the high operating costs. This can make your home more appealing to a wider range of buyers and can help you to command a higher selling price.
Second, a DIY solar heater can provide you with a sense of pride and accomplishment that you simply cannot get from buying a commercial system. There is something incredibly satisfying about building something with your own two hands, and a DIY solar heater is a project that you can be proud of for years to come. It is a conversation starter, a testament to your ingenuity, and a constant reminder of the power of the sun.
Finally, a DIY solar heater is a step towards a more sustainable and self-sufficient lifestyle. By harnessing the power of the sun to heat your pool, you are reducing your reliance on fossil fuels and doing your part to create a cleaner, more sustainable future. It is a small but meaningful step that can inspire you to take on other green projects and to live a more environmentally conscious life.
Troubleshooting Common Issues
Even with the best-laid plans, you may encounter a few issues with your DIY solar heater. The good news is that most common problems are easy to fix with a little bit of troubleshooting. Here are a few of the most common issues and how to resolve them.
If your system is not providing enough heat, the most likely culprit is a low flow rate. Check your diverter valve to ensure that you are sending enough water to the collectors. You may also want to check for any kinks or obstructions in your plumbing. If the flow rate is good, the problem may be a lack of sunlight. Be sure that your collectors are getting at least 6 hours of direct sunlight per day, and that they are not being shaded by trees or other obstructions.
If you have a leak in your system, the first step is to identify the source of the leak. If the leak is in a PVC pipe or fitting, it can be easily repaired with a PVC repair kit. If the leak is in a copper pipe or fitting, you will need to solder a patch over the leak. Be sure to drain the system before making any repairs, and to test the system for leaks before turning it back on.
If your system is not turning on or off automatically, the problem is likely with your solar controller. Check the controller to ensure that it is getting power and that the sensors are properly connected. You may also want to check the settings on the controller to ensure that they are correct for your specific system. If you are still having problems, you may need to replace the controller.
Your Quick-Start Guide to DIY Solar Heating
For under $500, you can build a 4’x8’ glazed solar collector that will raise your pool temperature by 5-10°F. The key is to use a copper pipe grid in an insulated box with a clear cover, and to have a slow flow rate of 3-5 gallons per minute.
A Rewarding Project That Pays for Itself
Building your own solar pool heater is a rewarding and cost-effective project that will provide you with years of free heat for your pool. It is a project that any handy homeowner can complete in a weekend, and it is a great way to learn about the power of solar energy. So what are you waiting for? Get out there and start building!

Lee Fondiller is a seasoned operations executive with over 20 years of experience in technology and sustainability. As COO of Solar4Pools, he leads innovation in the renewable energy industry with a focus on solar-powered solutions.